I promised to some of you to put together the step-by-step directions for building a media organizer like mine. Please refer to my previous post for images and description of the unit. Following are detailed instructions on how to build it.
Materials:
- 6 sheets of foam board 30" x 40" x 3/16" thick
- 1 piece of plexiglass (clear acrylic) 12" x 24" x 1/8" thick (0.125")
- glue gun, acrylic cutting knife
- white artist tape
- non-slip liner (optional)
Steps:
- Cut the foam board
- Build the main structure
- Build the trays
- Cut and glue the plexiglass
- Cut non-slip liners to size (optional)
1. CUT THE FOAM BOARD
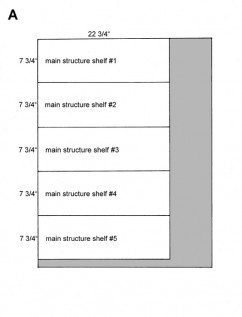
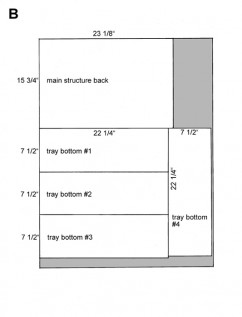
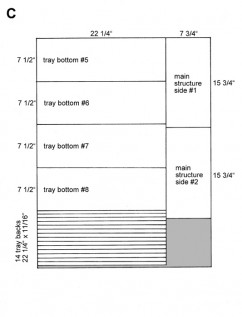
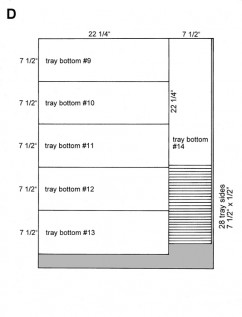
Use the four drawings below as guidelines. The white areas represent all the foam board pieces that you'll need for this project, while the gray areas are the left-overs. Remember that if you use smaller foam boards (20" x 30") you will have a lot more waste. Be very precise when you measure, draw, and cut your pieces.
Each drawing is a scaled representation of a 30" x 40" foam board. Drawing A needs to be repeated on three separate foam boards. Drawings B, C, and D are only used one time each (six boards total).
The media organizer is composed of two parts:
- the main structure, made of 15 shelves, two sides, and one back
- 14 removable trays, each one made of one bottom, one back, two sides, and a plexiglass front
Main structure dimensions:
- 15 shelves: 22 3/4" wide x 7 3/4" each
- 2 sides: 15 3/4" high x 7 3/4" each
- 1 back: 15 3/4" high x 23 1/8"
Trays dimensions:
- 14 bottoms: 22 1/4" x 7 1/2" each
- 14 backs: 22 1/4" x 11/16" each
- 28 sides: 7 1/2" x 1/2" each
2. BUILD THE MAIN STRUCTURE
This is the most challenging part of the project. I hope that by explaining how I did it, I can make it a little easier for you.
First you need to draw on both sides and on the back of the main structure the guidelines for the shelves.
Please note that the 15 shelves are a little less than one inch apart from each other. Sorry, I don't have the measurements for this step; you'll have to do the math.
When you have all your guidelines drawn, you can start gluing.
Gluing technique:
- place a strand of glue at the seam where the two surfaces meet
- do not place the glue directly on the foam of the board - the heat will melt the foam
- hold the foam board pieces in place until the glue cools down and feels solid
Begin by gluing together the two sides onto the back of the main structure. Then move on to the shelves.
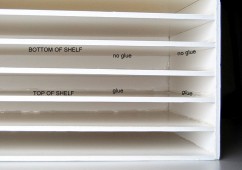
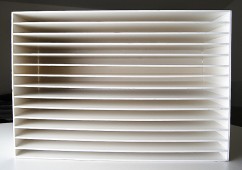
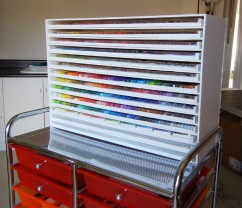
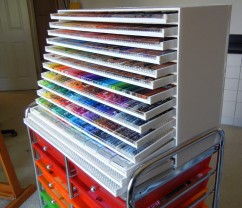
Proceed by gluing one shelf at a time. Make sure the shelf is in the right position. Place your glue strands on the three seams. Wait for the glue to cool down and move on to the next shelf until you are finished. Remember to place the glue only on the top side of the shelves, not the bottom (see picture #1 and #2).
3. BUILD THE TRAYS
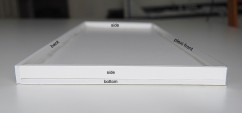
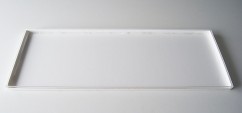
Glue the back of each tray to the bottom. Then glue the two sides over the bottom. See pictures #3 and #4.
4. CUT AND GLUE THE PLEXIGLASS
Do not remove the protective film from the plexiglass. You need 14 strips, each measuring 22 1/4" x 11/16". Draw your guidelines directly on the film.
If you have never cut plexiglass before, please practice a little before cutting the strips. I use the "score and snap method" with this type of knife.
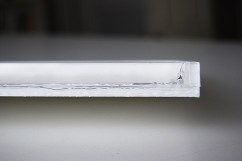
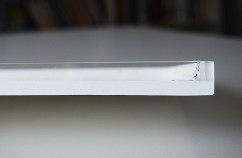
When you glue a plexiglass strip to a tray, it will look as in picture #5 where the glue is completely visible. I hid the glue with white artist tape for aesthetic reasons (picture #6).
5. CUT NON-SLIP LINERS TO SIZE
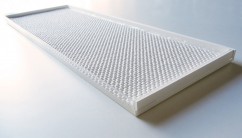
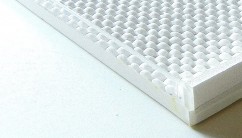
This is an optional step but I highly recommend it. I purchased the non-slip liner from my local home improvement store. It keeps pencils and other media from rolling even if the tray is on a slant (see pictures #7 and #8). The measurements of each liner are: 21 3/4'' x 7 1/4''.
Last but not least, turn your main structure upside-down so that the glue strands of the shelves are on the top, not on the bottom of the slots. This way there's no interference with the sliding of the trays.
After filling your trays with colorful media, from pencils to crayons and pastels, you can place them inside their slots (picture #9 and #10). Now you can finally enjoy your creation.
Let me know if this was helpful. Feel free to ask any questions along the way.

50 comments
My Art Studio: New Media Organizer | Ester Roi
February 27, 2011
[...] (2/27/2011): for step-by-step instructions visit this blog post. Trackback4 comments on this [...]
Cynthia Baird
February 27, 2011
Ester,
This is a wonderful idea and could be expanded for other uses, such as a flat paper storage. Of course, we would have to use sturdier materials than the foam core to withstand the weight of the paper. But done correctly, this could be a real money saver over purchasing wood or steel flat paper files.
Thanks so much for sharing this with everyone.
Yvette Perez
February 08, 2018
Perfect idea ,thank so much exactly what ive been looking for
Ester Roi
February 08, 2018
My pleasure, Yvette! :)
Ester Roi
February 27, 2011
You are welcome, Cynthia, I’m glad you can see the potential of projects like this one. There’s a much sturdier foam board that can be used in its place. It’s called “Gatorboard”, which provides an ideal combination of minimal weight and high load capacity.
Maxine Blackwell
February 28, 2011
Ester:
I am going to build my new organizer this week. Thank you so very much for the time and effort you extended in order to allow us to copy your wonderful idea. I know that it took a lot of your time to provide such detailed drawings and instructions. I am very grateful and will put your plans to good use.
Maxine Blackwell
Ester Roi
February 28, 2011
You are very welcome, Maxine.
Ines
February 28, 2011
Ester:
I cannot wait to go and look for appropriate materials over here in Germany.. sigh.. it would be so much easier to order it easily at dickblick..
Thank you so much for sharing your wonderful invention with us!!!
Ester Roi
February 28, 2011
The pleasure is mine, Ines.
Debbi Friedman
March 02, 2011
Ester I cannot believe how much time and energy you spent making this great invention available to everyone. You are a kind spirit and amazing to share so much with other artists. Thank you!
Ester Roi
March 02, 2011
You are welcome, Debbi.
Maxine Blackwell
April 09, 2011
Ester: I completed my pencil organizer. Thank you so much for the ‘blueprints’ and instructions that you created for us. You made the task simple and straight-forward. I am so pleased with the results and am most grateful to you for sharing your invention with us.
Maxine Blackwell
Ester Roi
April 09, 2011
Maxine, I’m so glad you let me know that you were successful at building the organizer. I hope you are going to love it as much as I love mine! There’s a lot of pleasure in sharing and giving back, especially for someone like me who always receives a lot.
Iracêma Marianne Mueller
August 09, 2013
Fantastic Art Organizer. My grandfather had one in wood for papers and I always wanted to make one for Media. Yours is wonderful for that.
Nancy Pingree Hoover
September 24, 2013
Oh my gosh, I can see my first project once my new studio gets built! Ester, you are so smart, coming up with these great ideas! Thank you so much for taking the time to show us and explain how you did it!
Ester Roi
October 01, 2013
Thank you, Nancy! My pleasure!
Ester Roi
October 03, 2013
Thank you, IRACÊMA! I’m glad you like it!
Vicki S
April 23, 2014
This is fantastic! Thanks for the detailed instructions!
Aren’t you loving DLP?
Ester Roi
April 24, 2014
My pleasure, Vicki! :)
foo
May 25, 2014
It’s beautiful! Has it held up to use or did the foam board sag? Love it.
Ester Roi
May 25, 2014
Thank you! Still using it every day! :)
Mary Dodd
September 24, 2014
Brilliant idea. I’d made trays from mount board and tape, made to fit an old art box, which have served the purpose well for several years. I’ve just bought a set of pastel pencils and a couple of empty drawer storage units. How I wish I’d seen this only three or four days ago! ha ha - never mind… It’s still a low cost great idea. Well done you!
Ester Roi
September 24, 2014
I’m glad you like it, Mary! Thank you! :)
Connie
February 04, 2015
Thanks so much for a great idea. It should be great for storing mt tubes of seed beads. I’ll check out the gator board, since the glass beads are heavier. It will be great ti be able to see all of the colors side by side.
Ester Roi
February 05, 2015
Great, Connie! Gatorboard would be awesome!
Kay
February 17, 2015
I just found this on Pinterest and love it! But I don’t understand at all how you glued the shelves in. I’ve read over the instructions several times and just don’t understand the logistics of it. The first few shelves shouldn’t be an issue, but once you get about 3/4 of the shelves in how do you fit the glue gun & your hand in? How are the last few shelves put in when you can’t fit in there?
Thanks for the help!
Ester Roi
February 18, 2015
Hi Kay, I hope this explains it. :)
After gluing together the main structure’s back, sides and bottom (not the top), glue one shelf at a time until your reach the top shelf which will be the top of the structure. The structure will be open and accessible until you glue the last shelf (top of the structure).
Teri
July 24, 2015
I love this. Just one negative comment- is it too much to ask that, when posting something like this that people are likely to want to be able to print out, that you also include a printer-friendly version? I will be making this but I have to print out and save the instructions until I have the time.
Ester Roi
July 24, 2015
Hi Teri, I’m working on a printer-friendly version and should have the link ready sometime today.
Ester Roi
July 25, 2015
You can print the blog post now (Control-P) and it should print correctly.
Lisa Giese
May 06, 2016
I made this cabinet but mine didn’t turn out as well as yours. I made mine 30” wide to fit in top of my cart. Some of my shelves seem to sag a little so a couple drawers are kinda hard to get out. But other than that, it works. Would like to make a better one some day but this was an awesome idea. Thank you. I’d show you pictures but I don’t see where I can attach them here.
Ester Roi
May 06, 2016
Glad you finished it, Lisa! At 30” wide I would have suggested Gatorbord, more expensive but much more rigid than foamboard. Send me the photos to .(JavaScript must be enabled to view this email address). I’d love to see them!
Susan Sloan
July 16, 2016
This is such a wonderful idea thanks so much for sharing. I posted a link to your blog in my coloring group and several others I’m members in everyone just loves it.
Ester Roi
July 17, 2016
My pleasure, Susan, and thank you for sharing it! :)
Carol Rhoton
August 30, 2016
Great idea Plan to order material today and get my husband involved in the production. Thanks!!!
Ester Roi
August 30, 2016
My pleasure, Carol! You’ll love it!
Linda Eska
October 07, 2016
I LOVE this and am anxious to make it. Your plans are so detailed. My one question is about volume. Using the dimensions given, how many colored pencils will fit in one drawer? I’ve got soooo many and need an idea of how many levels to make. Thanks so much for sharing.
Ester Roi
October 08, 2016
Hi Linda, I can fit about 65 pencils in each drawer.
Sarah
November 24, 2016
This is amazing! I would never have the patience, but I love the end result!
I’ve included this (and a link back to your post) on my blog post about “20 Clever Ways to Organize Your Coloring Supplies”
http://sarahrenaeclark.com/2016/20-clever-ways-to-organize-your-coloring-supplies
I hope you’ll pick up some new interest from my readers!
Ester Roi
November 25, 2016
Thank you, Sarah! :)
Bonita Brunner
March 21, 2018
I have never heard of Gatorboard. Where do you buy it? Thanks so mich for your idea and directions.
Ester Roi
March 22, 2018
My pleasure, Bonita! Gatorboard is a sturdier foam board that you can buy online. However, you can use foam board which is easier to cut or even cardboard which is less expensive.
Annie
April 08, 2018
For durability, instead of using the foam core for the shelves and outer unit you can use thin pressed wood or other comparable wood found at local DIY store and use wood glue to adhere shelves and overall unit and make the drawers out of foam core. It will be more expensive but won’t buckle.
Thank you for your amazing guide on how to make the organizer
Ester Roi
April 09, 2018
Great suggestion, Annie!
Victoria Tegg
March 29, 2019
Howdy! I know this is somewhat off topic but I was wondering which blog platform are you using for this website?
I’m getting sick and tired of WordPress because I’ve had problems with
hackers and I’m looking at alternatives for another platform.
I would be great if you could point me in the direction of a
good platform.
darknetmarketslink.com
Ester Roi
March 30, 2019
We originally launched this website back in 2012 using ExpressionEngine. It’s a custom built website, which required a developer to spend 50+ hours setting it up. If you were to hire a developer and have them build something custom, the recommendation would be to use something like Laravel, Ruby on Rails, or Craft. However, a custom website may be overkill and expensive for just a blog, so I would look at other options… and I would definitely avoid Wordpress!
I hope this is helpful.
Erin
March 07, 2020
Hi Thank you so so much for this! Seems like an answer to all my organization problems. I was wondering what type of glue gun you use and what temperature. I have a heavy duty one and a small one so 20 watt and 100 watt and I don’t want to melt the foam. What do you recommend l?
Ester Roi
March 08, 2020
You’re welcome, Erin!
The glue gun I used is 40 watt.
Please read my instructions on gluing technique:
- place a strand of glue at the seam where the two surfaces meet
- do not place the glue directly on the foam of the board - the heat will melt the foam
- hold the foam board pieces in place until the glue cools down and feels solid
If I had to do it again I would use Double Wall Corrugated Cardboard Sheets in place of foam board, less expensive and easier to glue together. They even have them in white.
Amanda
April 04, 2023
Hi Ester!
Thank you so much for the detailed plans! I’m amazed at your creativity!
I work with a variety of mediums including colored pencils, brush markers, fineliners, chalk markers, acrylic paint pens, paint brushes, and oil pastels. Obviously, the mediums are of various sizes. The smallest items would be the paint brushes and the largest would be the size of a large Posca paint pen. In your opinion, would your media organizer work for my purposes?
I appreciate your time in creating such an amazing organizer as well as responding to questions. Any additional tips or opinions are welcome.
Respectfully,
Amanda Dickson
Ester Roi
April 05, 2023
Thank you so much, Amanda!
I use my media organizer only for colored pencils, Neocolors and oil pastels. I’m not familiar with some of the products you mentioned.
The size of each tray is 22-1/4” wide x 7-1/2” deep. The space between the shelves is about ¾”, meaning you wouldn’t be able to fit anything thicker than ¾”.
If the products you use don’t fit that space, I suggest you change the measurements. I realize it’s very tedious work but I don’t have any other solution.
Here are photos of my organizer with the products I use inside the trays:
https://www.esterroi.com/blog/post/2011/02/my-art-studio-new-media-organizer
All the best to you!